Showing posts with label Windows. Show all posts

Friday, 14 August 2015

Step-by-step tutorial How to log in to an Administrative acc on any Windows


Are you locked out of your own Windows PC because you cant remember the Administrator password, Its me posted step-by-step tutorial showing how to log in to an administrative account on any Windows computer.
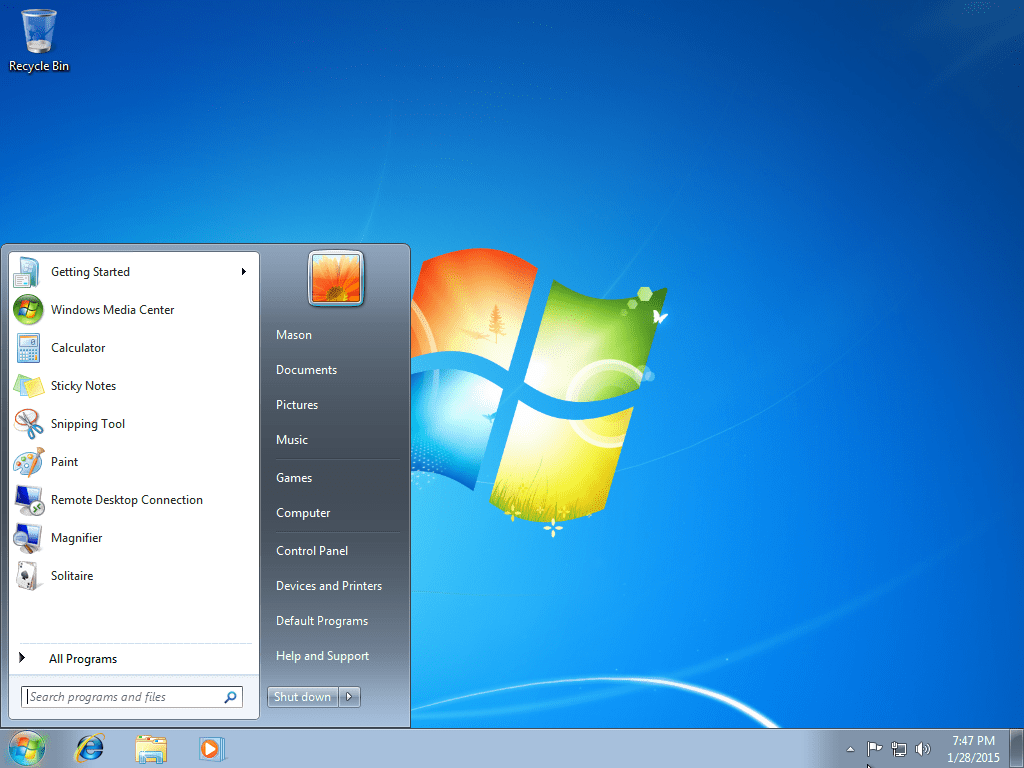

WARNING: I am NOT responsible for any expulsions or such if you do this at school/work! First, restart your computer.
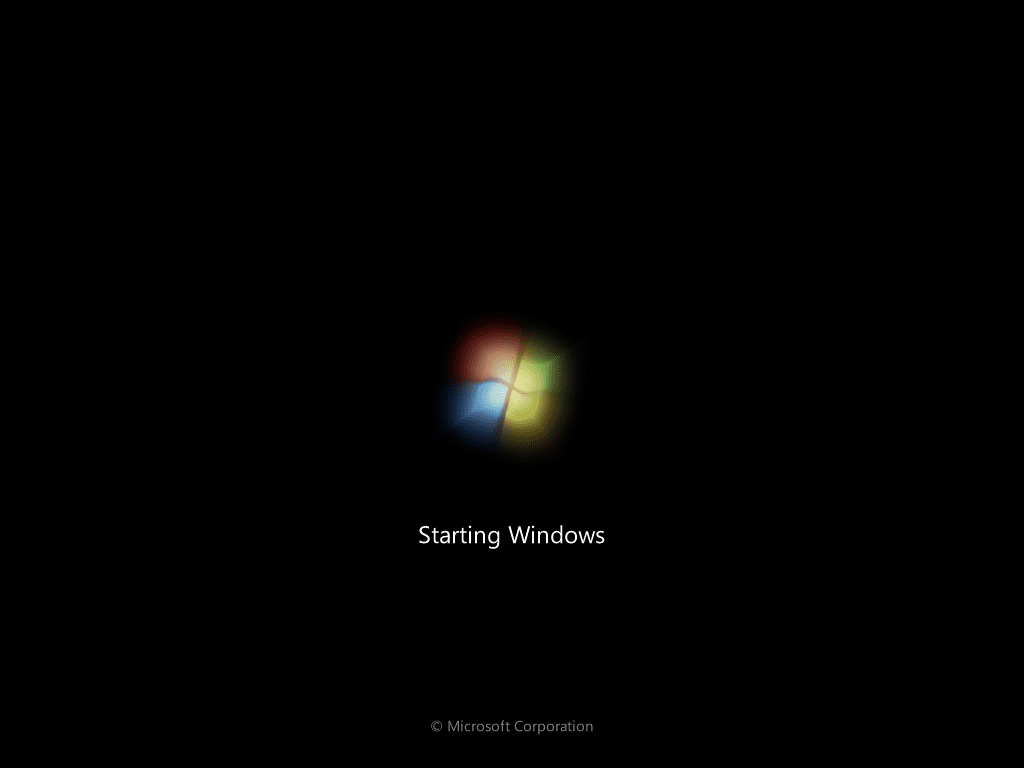

Once you get to this screen, hold the power button on the computer until it turns off (no damage will be done, trust me).
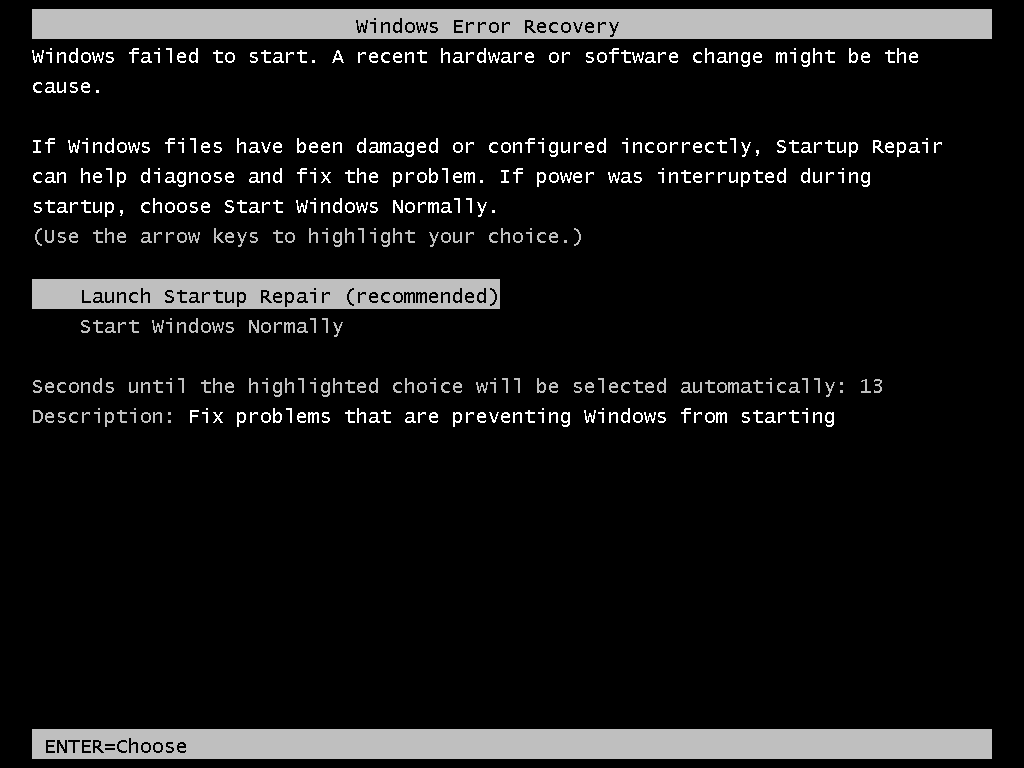

If you did it correctly, you should get this screen. If you get something like “Windows did not shut down correctly,” try again. Otherwise, select “Launch Startup Repair.”
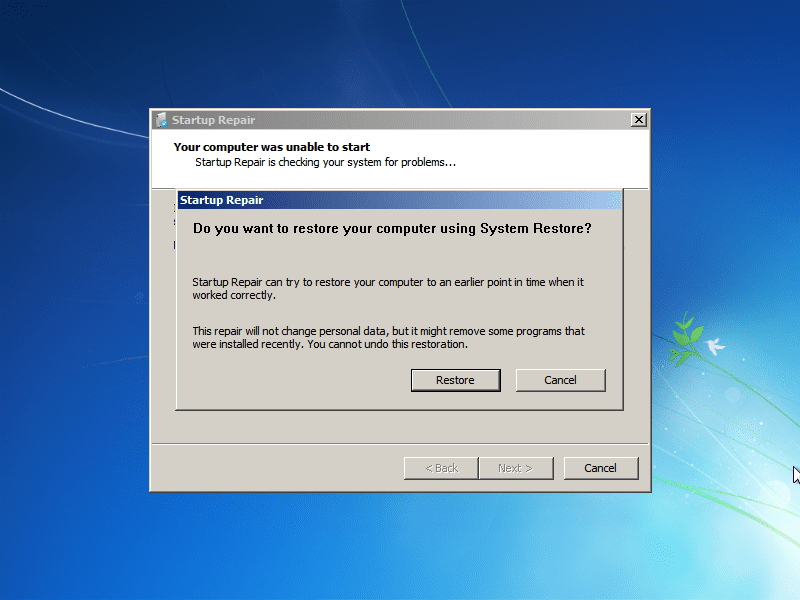

Let the repair go through. If you get this window, select “Cancel.”
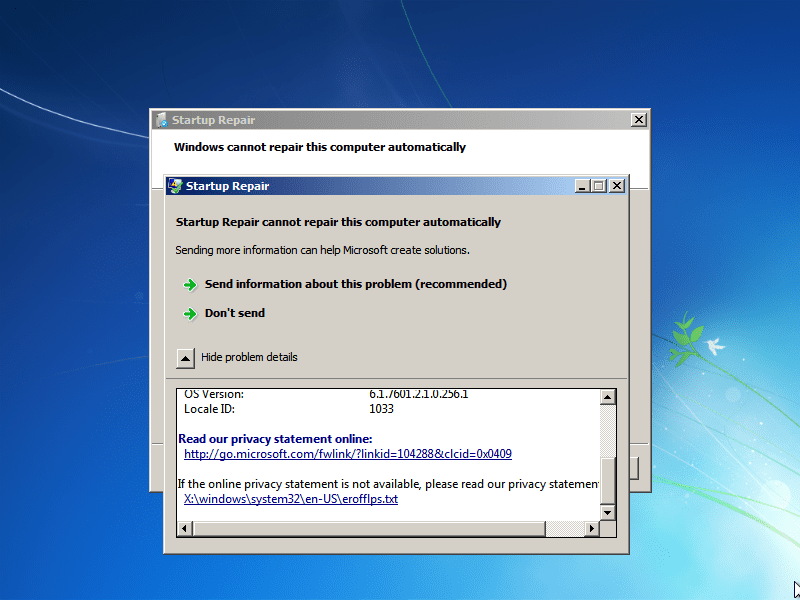

When you get this window, click on “Show problem details.” Scroll down, and click the link on the very bottom. Notepad should pop up.
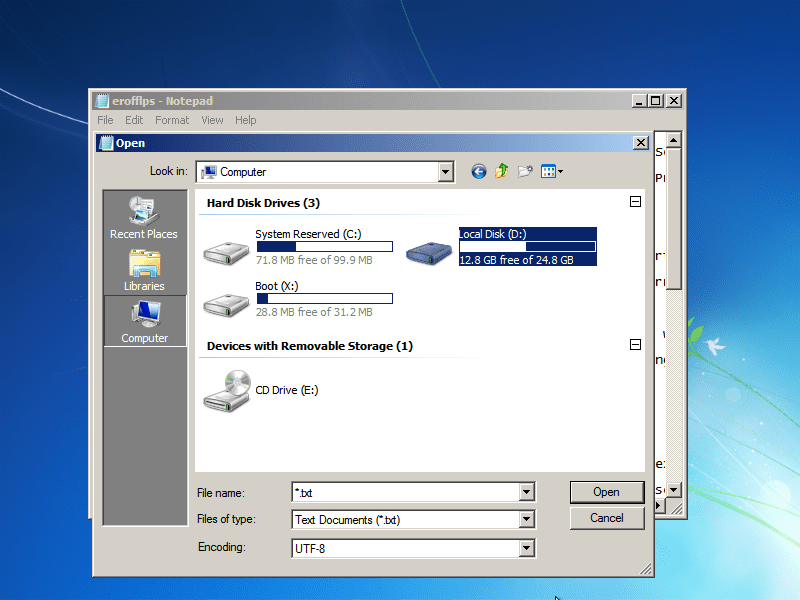

Go to File/Open, and double-click your “Local Disk” (Mine is D:/ because I have a virtual machine. Yours will probably be C:/).
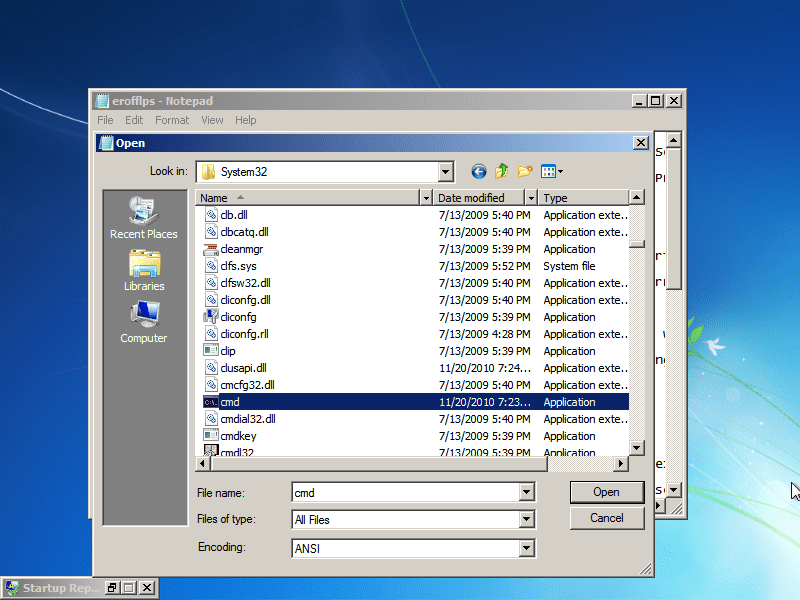

Go to Windows/System32. Now do EXACTLY as I say, or you MIGHT break the computer. Under “Files of type,” select “All files.” Scroll down and find “cmd,” then make a copy of it in the same folder (Ctrl-C, Ctrl-V). You should get a file named “cmd – Copy” or something like that.
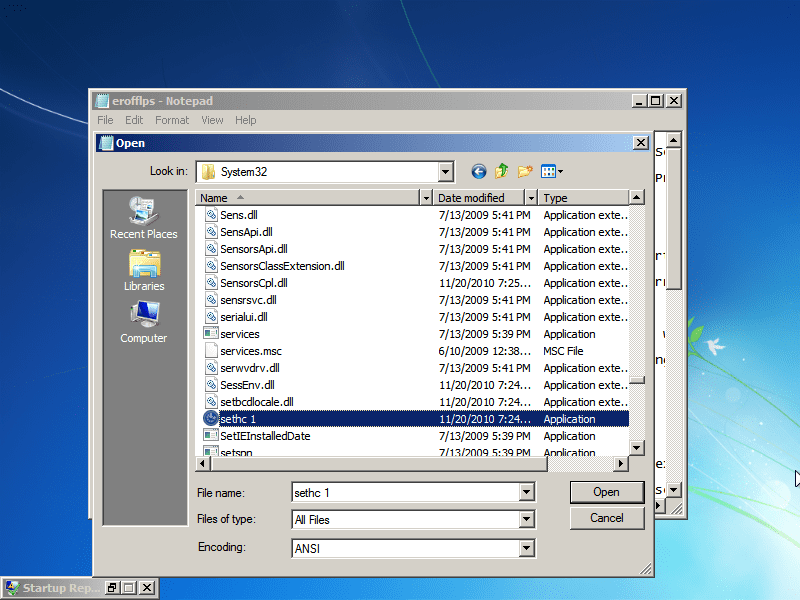

Find “sethc” in the same folder. This file executes sticky keys. Rename it to “sethc 1.”
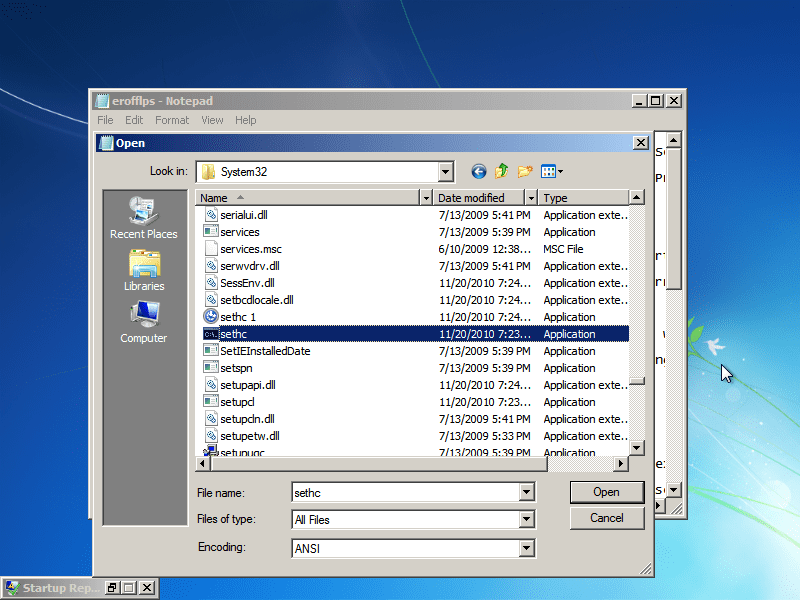

Rename your “cmd – Copy” to “sethc.” Close notepad, and hit “Finish” to shut down your PC, or just restart it manually.
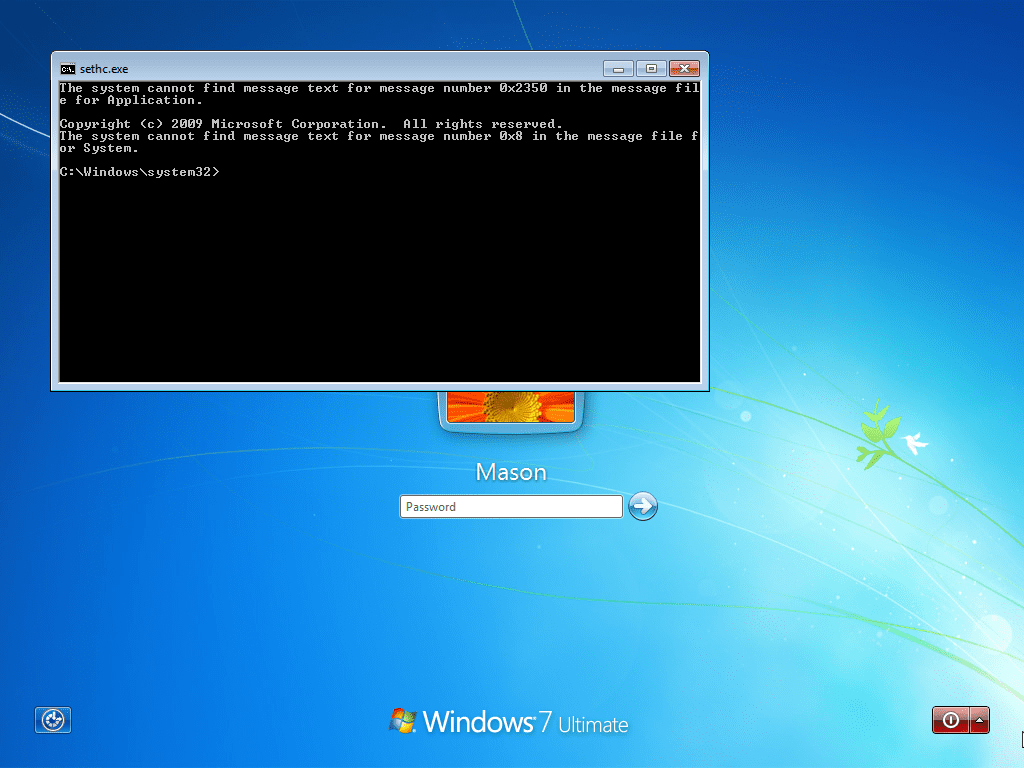

Once you get back to the login screen (where it says “Press Control – Alt – Delete.” Ignore my background, I don’t have that enabled), press “Shift” 5 times to open up the command prompt.
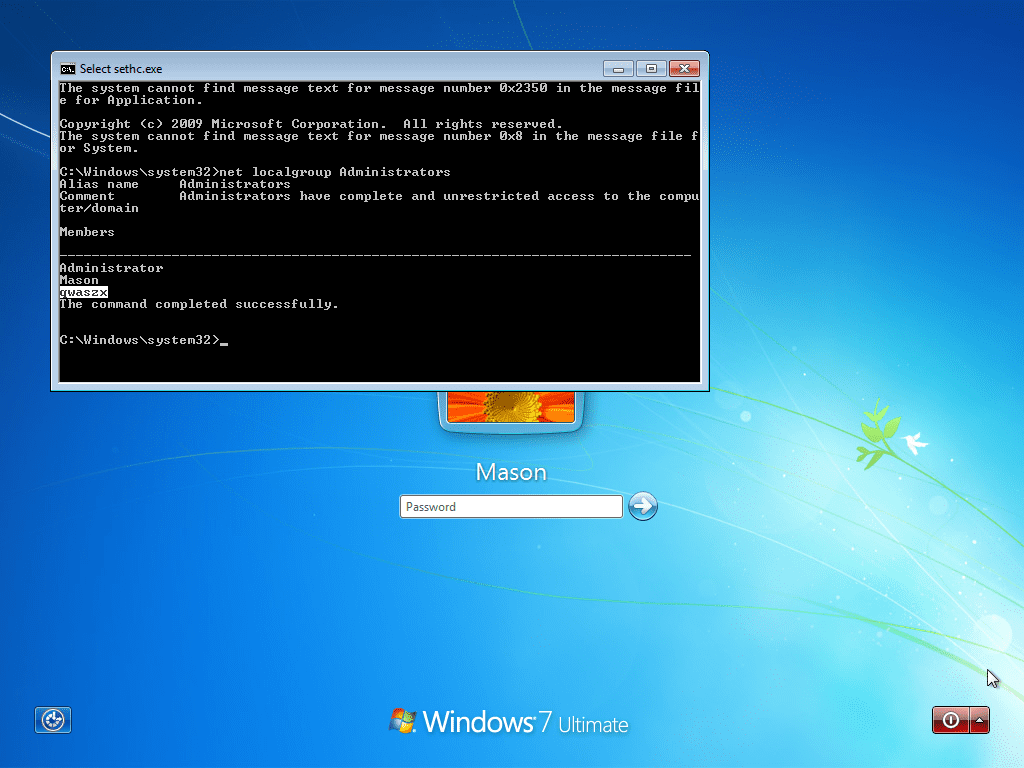

Next, we need to find out what user is the local administrator for this PC. To do this, type “net localgroup Administrators” and look for any administrator that does NOT have your school/work domain in front of it, followed by a “/.” As you can see, one of the admins is named “qwaszx.” You will probably see a name like this, since schools/workspaces tend to make it a random string of letters and/or numbers to ward off people from entering it.


Now, we need to change that account’s password. Type “net user <ACCOUNT NAME HERE> *” and type the new password twice. It will not show what you’re typing, but your keystrokes are being registered. You can now log in to your admin account! However, schools/workspaces also like to disable the admin account you just changed the password for, so you might not be able to log in. There is a simple fix. If you get that message, go to the extra step below.
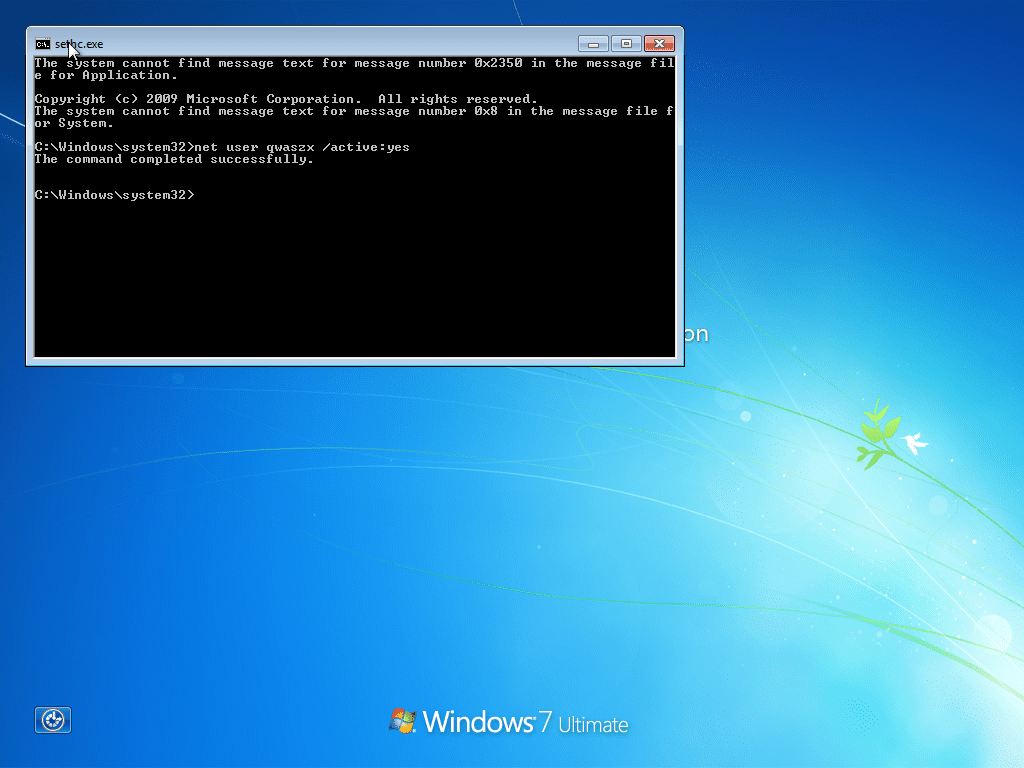

If the admin account is disabled, type “net user <ACCOUNT NAME HERE> /active:yes” You will now be able to log in.
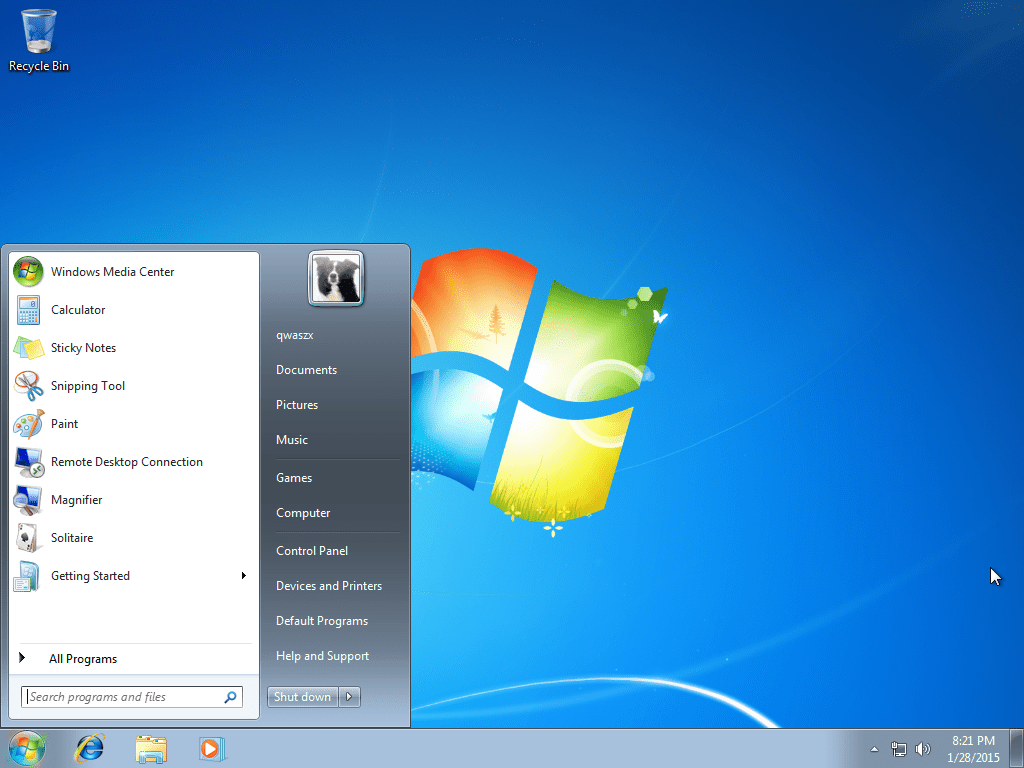

You now have full admin rights to the PC. Enjoy! AGAIN, I AM NOT RESPONSIBLE FOR ANY MISTAKES OR DAMAGES TO THE COMPUTER OR NETWORK. DO AT YOUR OWN RISK!

Friday, 7 November 2014

3 reasons why the Windows 10 command prompt is the bomb diggy


The command prompt has been adored by windows administrators and power users for years.  Proficient command prompt aficionados could bang out commands and get results seconds before their less nimble peers who were still fettered to the Windows GUI.

But despite the utility of the command prompt there were always a few things that bothered me.  The Mac terminal window looked cooler than the Windows command prompt.  That frosty, diaphanous, terminal window was legendary and really made using the terminal more enjoyable.
There were ways to hack the command prompt to make it look sexier but sometimes it didn’t always work.
The other little thing that bothered me was the fact that I couldn’t easily copy and paste commands into the windows command prompt.
Admins were basically forced to take the circuitous path of right clicking the window and choosing Paste from the context menu.
Well – I’ve had enough of the shenanigans and I’m here to avow that in Windows 10 all your command prompt dreams come true.
In this post I’m going to show you 3 reasons why the Windows 10 command prompt is the bomb diggy.  I can’t get enough of it.
Check it out yo.

1. Making the command prompt ghosty

First let’s make it sexy.
To adjust the transparency of the command prompt window, right click the title bar and choose Properties.
Click the Experimental tab and then put a check in Enable experimental console features (applies globally).
This makes the Opacity slider leap to life.  Now you you spend your Saturday afternoon sliding the bar back and forth until you find the perfect translucence.

Windows 10 command prompt experimental opacity
Click OK and changes are immediate.  There’s no need to restart the console window.

2. Enabling Ctrl + c and Ctrl + v

You can start copying and pasting text into the command prompt using Ctrl + c and Ctrl + v by revisiting theExperimental tab and placing a check in Enable new Ctrl key shortcuts.
Enabling ctrl c and ctrl v in the Windows 10 command prompt
Click OK, restart the command prompt and then start pasting text in with Ctrl + v!
Oh wait – I should mention something: since Ctrl + is now assigned to copying text you can’t use it to terminate a stubborn process from the command line.
Technically, you could try Ctrl + break to kill a frozen process but I think Ctrl + c is the preferred way of extricating yourself from command line emergencies.

3. Dynamically resize text

In prior versions of Windows, if the command prompt output was longer than the window width a horizontal scroll bar would appear allowing you to scroll right to read the rest of the text.
Well in Windows 10, you can now automatically wrap text in real-time as you expand and contract the width of the command window.
In the Experimental tab, just check Wrap text output on resize, relaunch the command window, bang out your favorite command and start stretching and squeezing the window width until it sings.
lol.
Flaunting word wrap in the Windows 10 command prompt baby!
Cool eh?

The Bottom Line

Microsoft is listening!
Well, at least when it comes to improving the functionality of the command prompt.  The new features such asopacityword wrap and keyboard shortcuts makes using the command prompt fun again.
How’s your experience been with the Windows 10 command prompt? Please share your story in the comments below.  Do you know of any other shortcuts?

Here’s how to get the silly Windows 8 Start Screen back in Windows 10


Some people have been using the Start Screen for so long that they’ve developed an embarrassing, almostparadoxical love for it. The Start Screen is one of those things that the public has simply acquiesced to because it didn’t really have a choice. 

With the advent of Windows 10, the Start Screen is gone but some people feel forlorn with its absence. That’s why today I’m going to show you how to get that silly start screen back. 

Let’s get on with it! 

To boot to the Start Screen instead of the Start Menu in Windows 10, right-click the Taskbar and chooseProperties from the context menu. 


Click on over to the Start Menu tab and uncheck Use the Start menu instead of the Start Screen. 


Windows will censure you about saving your work. It needs to log out to commit your changes so if you’re not ready for that just click Cancel and save your stuff first. 


Now when you login and click the Start Button, your forsaken Start Screen appears and takes over your monitor like it did in the Windows 8 days. (seems so long ago since we skipped Windows 9 doesn’t it?) 


If you want Windows to automatically display the Start Screen at sign-on, go back to your Taskbarproperties, click the Navigation Tab and uncheck When I sign in or close all apps on a screen, go to the desktop instead of Start. 


Once you get tired of the Start Screen (I’m sure you will) just return to the Start Menu tab and put a check in the box you originally deselected.

Thursday, 6 November 2014

How can I make the Windows 10 Start Menu feel like Windows 7?


The new start menu is a flexible, configurable collection of icons and links.  And although Microsoft did a good job blending the benefits of the Windows 8 start screen with the familiarity of the Windows 7 start menu, I still think people will find that the, constantly updating, garish collection of live tiles are both a little juvenile and distracting for everyday use.

That’s why in this post I’m going to show you how to slash the pounds off the Start Menu.  We’re going to purge the fat by removing those annoying live tiles and then we’ll spruce up the menu by changing the background color.
Let’s go!
We can put the Start Menu on a diet by right-clicking each live tile and choosing Unpin from the context menu.
Unpinning live tiles from the Start Menu in Windows 10
Unfortunately, you have to manually right click each tile to do this.  You can’t hold down the Ctrl key to select multiple tiles – which is a little nettlesome but I can live with that.
Now look at your new Start Menu.
Slimming down the Start Menu in Windows 10
It’s nicer but we can actually trim even more weight from the Start Menu.
Push your mouse cursor right along the top vertical edge of the menu until it your cursor changes into a double headed arrow.
Now you can click to drag the menu down to a smaller size…
Click to drag the menu to a smaller size
or stretch it out to its maximum height.
Stretching out the Start Menu
Okay, great but I don’t think the sky blue background of the start menu complements the muted colors of my wallpaper.
Let’s change that.
Near the bottom of the Start Menu, right click the vertical space directly above the All Apps button and choose Personalize from the context menu.
Personalizing the Start Menu in Windows 10
Now you can change the background color to almost anything you want.
I made an abortive effort trying to change it to white but charcoal looks good so I’ll probably pick this one.
Changing the color and appearance of the Start Menu in Windows 10
Oh wait, hot pink is pretty bold.  It’s jarring and surprising – sort of like me.
I’m going with this one.
Having fun with the Start Menu in Windows 10
When you want to add your live tiles back to the Start Menu you can click the All Apps button located directly above the search box and then right click the tiles you want to Pin to Start.
Pinning tiles to the Start Menu in Windows 10
I love it!
Now I admit this doesn’t look anything like the Windows 7 start menu but doesn’t it at least look better than the Windows 10 start menu?  What do you think?

How to remove Favorites and Frequent Folders in the Windows 10 File Explorer


Windows 10 is upon us and there are a few things that I like and others that I hate.

I’ve been playing with Windows 10 for several weeks now and have developed a penchant for the remixed start menu and diaphanous command prompt.  I’ve also grown to like Virtual Desktops but there are a few other things about Windows 10 that annoy me.
Today I want to talk about one of those annoyances.
By default, when you click File Explorer, you’ll see a new option at the top of the left navigation pane calledHome.
Unfortunately, there’s little about Home that makes me want to live there.
It’s just a mashup off all my favorites, frequent folders and recent files.
In fact, if you take a closer look, you’ll notice that Favorites is already displayed in the left pane under the yellow star – so why is it also on the Home Screen?
Can someone say redundant twice?  It seems like a waste to me.
Let’s make Home more useful by yanking those frivolously icons and replacing them with your local drives.  
Windows 10 File Explorer has a Home section now
We’re going to make it resemble what we see under This PC.
Unfortunately there’s no easy point and click solution to this.  We need to crack open the registry and rename the registry keys that correspond to Recent Files, Recent Folders, and Favorites.

Getting the reticent registry to talk

As the Administrator, press the Windows logo Key on your keyboard and type regedit in the search box.  Incidentally, now is probably a good time to backup the registry.
Now click through the tree in the left pane until you get DelegateFolders.
Here’s the full path:
HKEY_LOCAL_MACHINE\SOFTWARE\Microsoft\Windows\CurrentVersion\Explorer\HomeFolder\NameSpace\DelegateFolders
You’ll see three cryptic keys in registry which relates to your recent files, folders and favorites folders.
  • Recent Files {3936E9E4-D92C-4EEE-A85A-BC16D5EA0819}
  • Recent Folders {4564b25e-30cd-4787-82ba-39e73a750b14}
  • Favorites {d34a6ca6-62c2-4c34-8a7c-14709c1ad938}
Click each one, press F2 and then add fbv (for fixedByVonnie) to the beginning of the string.  So for example, Recent files changes from:
{3936E9E4-D92C-4EEE-A85A-BC16D5EA0819}
to
fbv{3936E9E4-D92C-4EEE-A85A-BC16D5EA0819}
Hahaha I had to plug my site in the screenshot somehow!
Removing recent files from the home screen
Now if you return to File Explorer and press F5 to refresh the view, you should notice that everything is empty!
Blank Home Screen in Windows 10
That’s not what we want, so let’s add a new registry key to get some useful stuff in here!
In the registry, right click DelegateFolders and mouse over to New and choose Key.
Adding a new key to the registry
Paste in the following key name:
{20d04fe0-3aea-1069-a2d8-08002b30309d}
and double click the (Default) string in the right pane and set the value to “This PC
Adding the This PC registry key to show local drives in Windows 10
Now when you refresh the File Explorer view you’ll have your drives sitting in the Home screen.
DIsplaying Windows 10 drives in the home screen
If you want Windows to honor your privacy and stop recording your recent files, just right click the Taskbar at the bottom of the screen, choose Properties and in the Start Menu tab uncheck Store and display recently opened items in the Start menu and the taskbar.
Tell Windows 10 to stop displaying recently opened items on the taskbar

The Bottom Line

Hopefully Microsoft will include native support for File Explorer customizations like this one in a future Windows 10 update. Making users dive into the registry to make changes for simple personalization is both cumbersome and dangerous.
I think the problem with File Explorer is that with each iteration of Windows, Microsoft seems to keep adding clutter to the screen.
File Explorer has become a confused mess of icons and settings that baffles both tech tyros and seasoned technicians alike.
What ever happened to the Windows Explorer of the halcyon Windows XP days?  Sure maybe my quixotic vision of a clutter free Windows Explorer isn’t realistic but in the very least Microsoft should make it easier for users to hide the things they don’t want to view in File Explorer.
What do you think about the evolution of File Explorer in Windows?  Is it becoming more cluttered?  Am I the only one who thinks this?
Please share in the comments!