Showing posts with label Maintenance. Show all posts

Thursday, 8 October 2015

How to configure Telnet Server in RHEL6

In this article I will configure Telnet Server in RHEL 6. Telnet protocol allows you to connect to remote hosts over TCP/IP network.
Telnet was developed in 1969. Telnet was initially developed for private use where security was not primary concern. Telnet protocol has serious security issue. Security expert recommend that the use of Telnet for remote login should be discontinued under all normal circumstances.
  • Telnet Server
  • Telnet Client

Telnet Sever

Telnet server software is installed on remote host. You need to configure it before client can connect with it.

Telnet Client

Telnet client software allows you to connect telnet server. Once telnet client establishes a connection to the remote host, client becomes a virtual terminal, allowing you to communicate with the remote host from your computer.

Security issue with Telnet

  • Telnet by default does not encrypt any data sent over the connection.
  • Anyone who has access to network device located on the network between the two hosts like router, switch, hub or gateway where Telnet is being used can intercept the packets passing by and obtain login, password and whatever else is typed with a packet sniffer software.
  • Telnet protocol have no implementations that would ensure that communication is carried out between the two hosts is not intercepted in the middle.
In this tutorial I will configure telnet server in LAB environment. 
  • In RHEL Telnet is part of the xinetd daemon.
  • Telnet use plain text to transmit password.
  • root user is not allowed to connect using Telnet.
  • Command-line telnet clients are built into all major operating systems.
  • RedHat recommends you to use SSH to connect a system instead of Telnet.
  • Use Telnet in LAB environment where security is not concern.

Configure Telnet in RHEL 6

Three RPM are required to configure telnet server in linux.
  • xinetd
  • telnet-server
  • telnet-clinet
Login from root user and check required RPM. If you do not have the telnet-server or telnet packages installed, you can install them with the RPMs available from your installation media. The version numbers of the package should not matter, Red Hat Network (RHN) will always provide you with the latest version of the package.
server-rpm
Once you have the packages installed, check the /etc/xinetd.d/telnet file
server-etc-xinetd-telnet
ensure that disable = yes is changed to read disable = no.
server-telnet-file
Turn the Telnet server on using the chkconfig command.
server-chkconfig-telnet
Also check xinetd service
server-chkconfig-xinetd
You will need to restart the xinetd service.
server-xinetd-restart
As I said above root user is not allowed to login from telnet. We need to create a normal user account.
server-useradd
To connect with telnet server we need specify server IP address which you can check with ifconfig command. You should test telnet configuration before connecting from client computer.
server-testing-on-server
To terminate telnet session logout from logged in user.
server-testing-exit

Configure telnet client in RHEL6

Go on linuxclient system. linuxclient system have RHEL 6 installed and connected with our server system. Login from root and check telnet and xinetd package
linuxclient-check-rpm
check telnet service status on it if it is set to off
linuxclient-chkconfig-telnet
open configuration file of telnet
linuxclient-etc-xinetd-telnet
check telnet service is enabled make sure that disable = yes is changed to disable = no
linuxclient-telnet-config-file
restart the xinetd service
linuxclient-xinetd-restart
Check connectivity with server
linuxclient-ping
We are getting reply of ping from server so we have connectivity with server .connect with telnet server
linuxclient-telnet-unable-to-reach-host
Error
telnet:connect to address 192.168.1.1:No route to host
Telnet client is unable to connect with telnet server because firewall on server is blocking telnet connection. To solve this error Go on server
Run setup command
server-setup
select Firewall configuration
server-setup-firewall
Firewall is enabled by default
server-firewall-enabled
To disable the firewall unselect the enable
server-firewall-unchked
Ignore the warning and select OK and press enter
server-firewall-warning-ok
Select Quit and press enter to save the configuration
server-firewall-quit-to-save
restart the xinetd service
server-xinetd-restart
Now come back to linuxclient system and try to connect with telnet sever
linuxclient-telnet-sucess
This time we have successfully connected with Telnet server. To terminate telnet session logout from testuser.We have successfully configured Telnet client on RHEL 6.

How configure Telnet client on Window 7

Open command prompt and run telnet command
windowclient-telnet
Error
 'telnet' is not recognized as an internal or external command, operable program or batch file.
windowclient-unrecognized-telnet
You will get error because Window 7 does not turn on telnet client service automatic. We need to start it manually.
Open control panel and click on program.
windowclient-control-pannel-program
click on turn windows features on or off
windowclient-program-window
Scroll down and check mark on Telnet client and click on OK
windowclient-checked-telnet
Now you can run telnet command. Login form normal user
windowclient-logged-in-normal-user
logout from normal user and try to login from root
windowclient-exit-from-normal-user
By default root user is not allowed to login through the terminal session
windowclient-root-fail
To allow root user Go on server system and open /etc/securetty file
server-etc-securetty
In the end of file add pts/0 and save the file
server-pts
Go back on windowclient system and try again to login from root user
windowclient-root-sucess
In this article I have configured Telnet server on RHEL6 system in LAB environment.

Friday, 14 August 2015

Step-by-step tutorial How to log in to an Administrative acc on any Windows


Are you locked out of your own Windows PC because you cant remember the Administrator password, Its me posted step-by-step tutorial showing how to log in to an administrative account on any Windows computer.


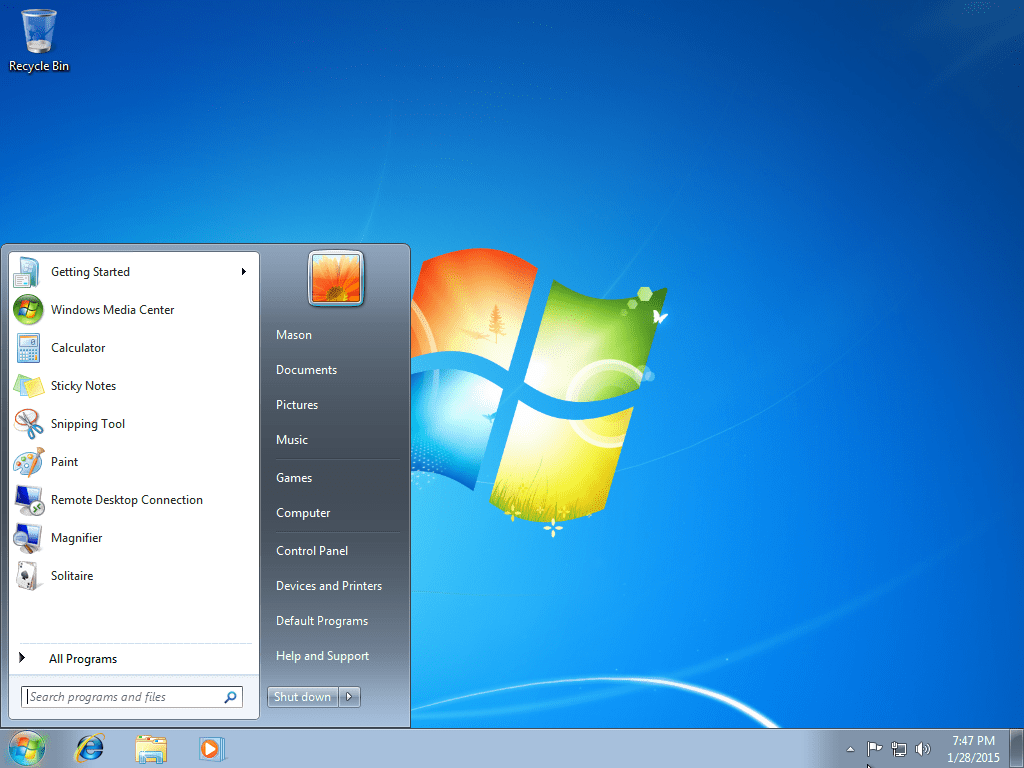
WARNING: I am NOT responsible for any expulsions or such if you do this at school/work! First, restart your computer.


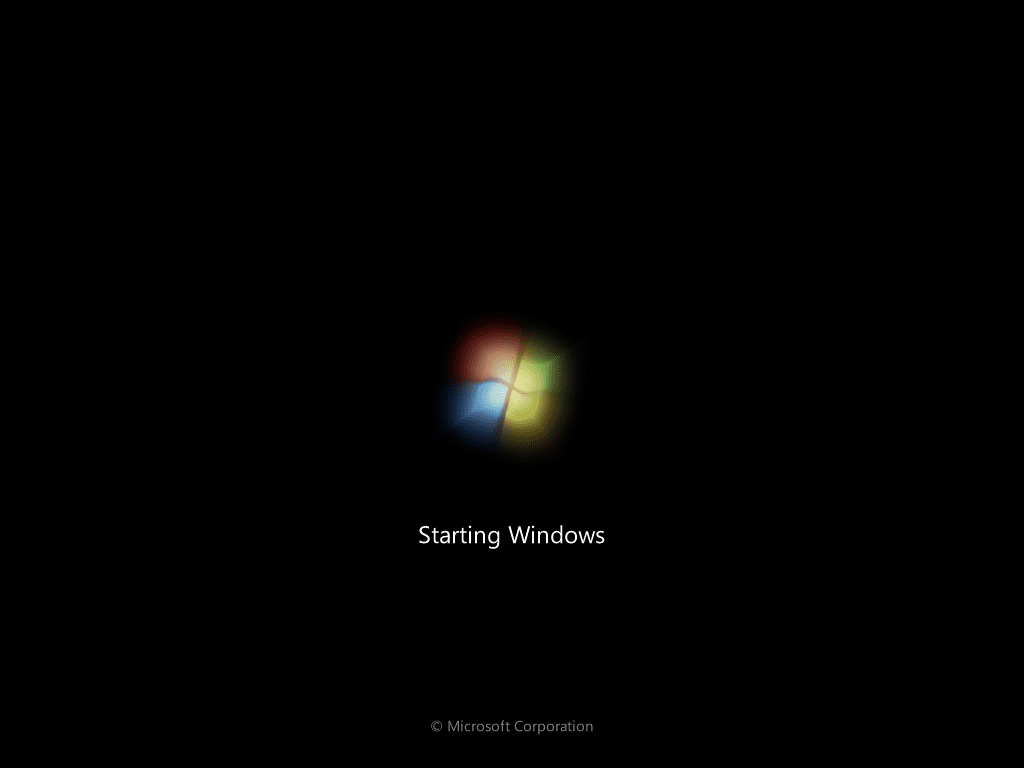
Once you get to this screen, hold the power button on the computer until it turns off (no damage will be done, trust me).


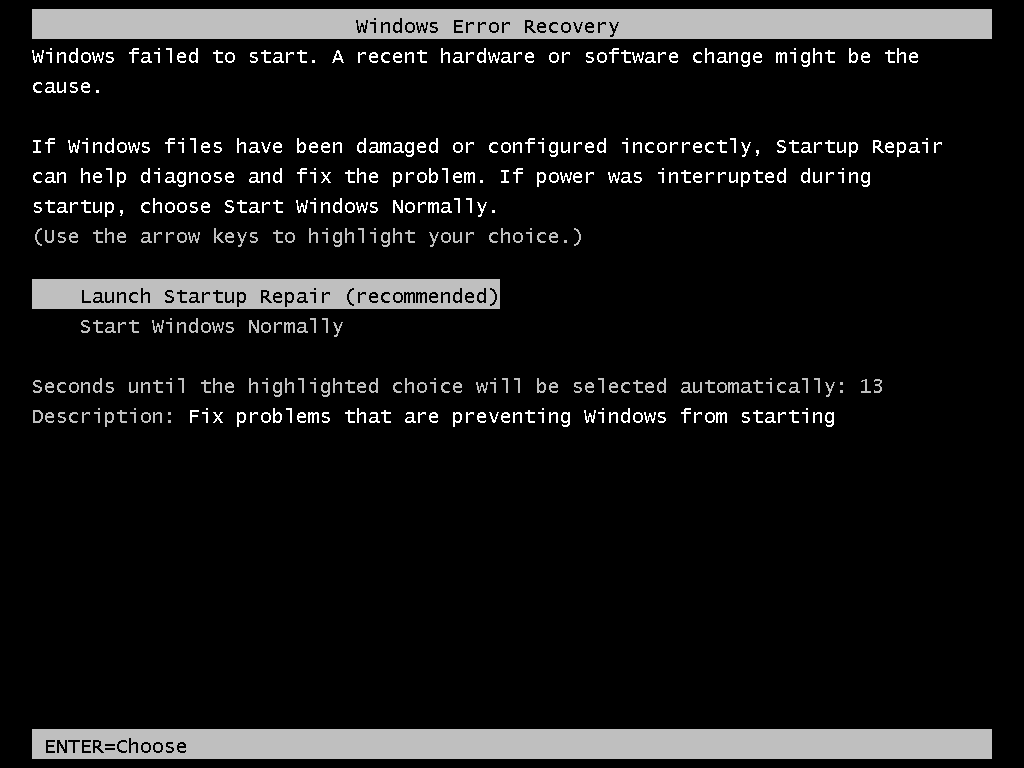
If you did it correctly, you should get this screen. If you get something like “Windows did not shut down correctly,” try again. Otherwise, select “Launch Startup Repair.”


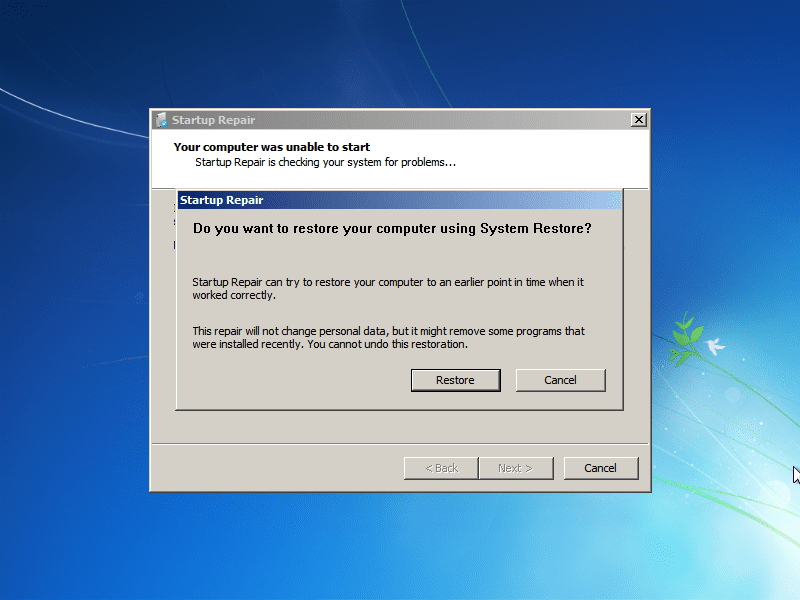
Let the repair go through. If you get this window, select “Cancel.”


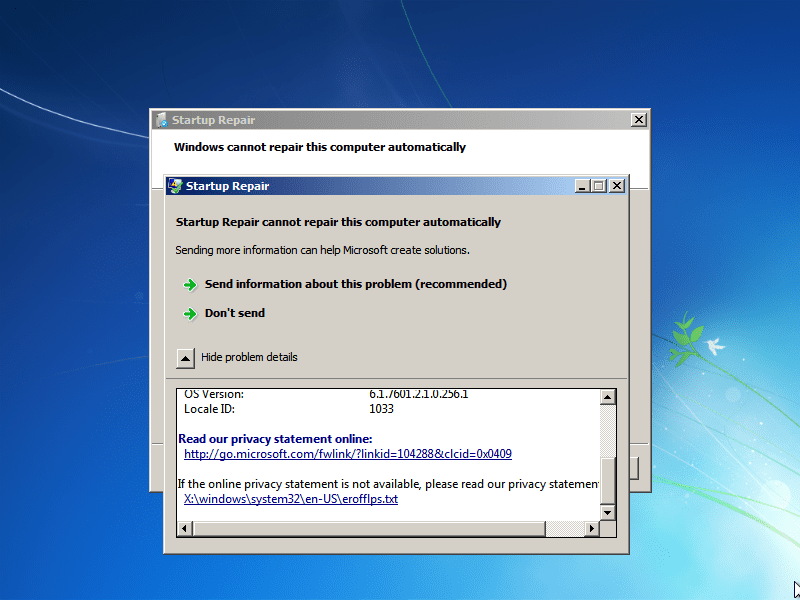
When you get this window, click on “Show problem details.” Scroll down, and click the link on the very bottom. Notepad should pop up.


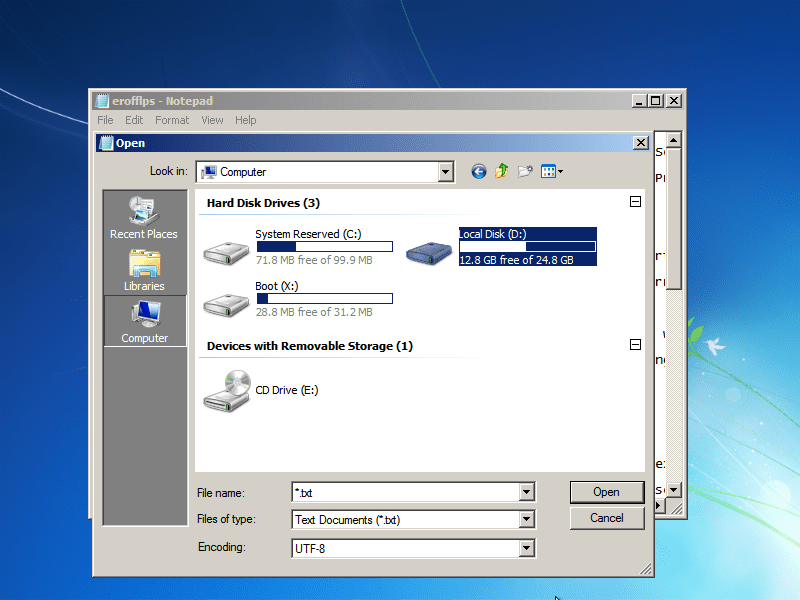
Go to File/Open, and double-click your “Local Disk” (Mine is D:/ because I have a virtual machine. Yours will probably be C:/).


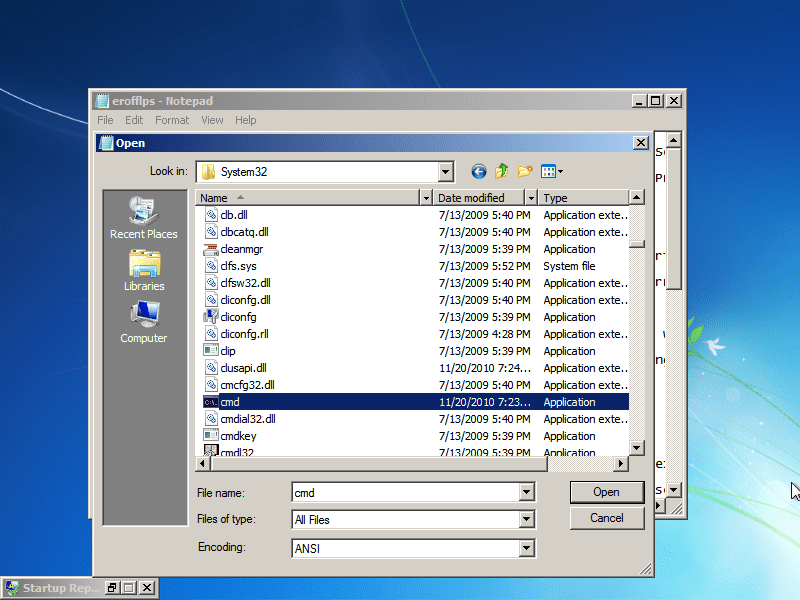
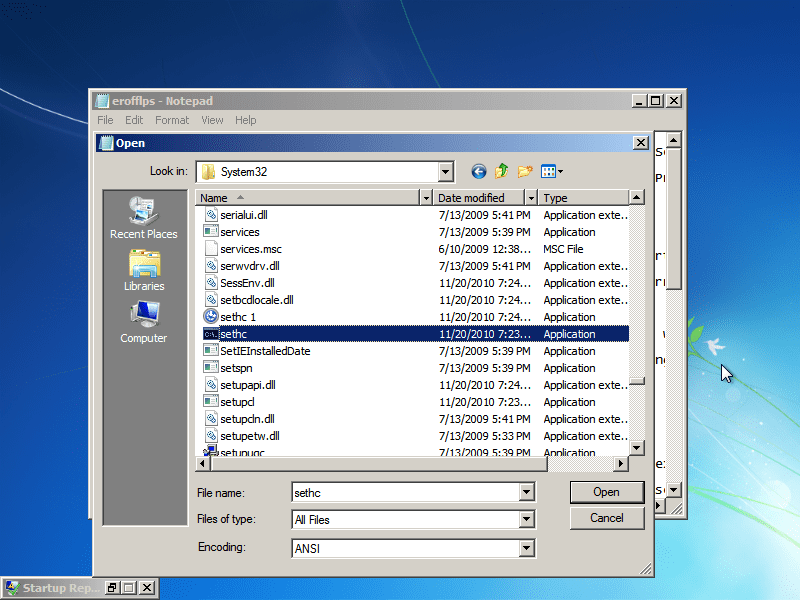
Go to Windows/System32. Now do EXACTLY as I say, or you MIGHT break the computer. Under “Files of type,” select “All files.” Scroll down and find “cmd,” then make a copy of it in the same folder (Ctrl-C, Ctrl-V). You should get a file named “cmd – Copy” or something like that.


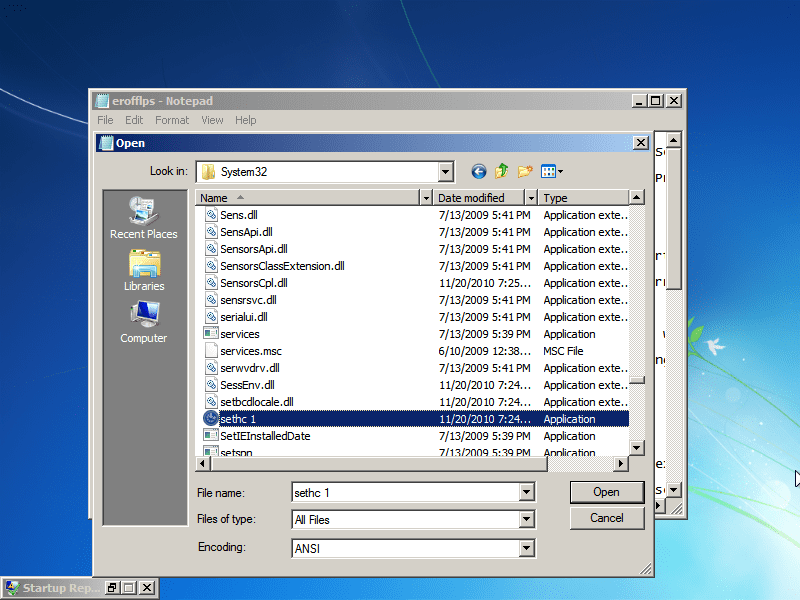
Find “sethc” in the same folder. This file executes sticky keys. Rename it to “sethc 1.”


Rename your “cmd – Copy” to “sethc.” Close notepad, and hit “Finish” to shut down your PC, or just restart it manually.


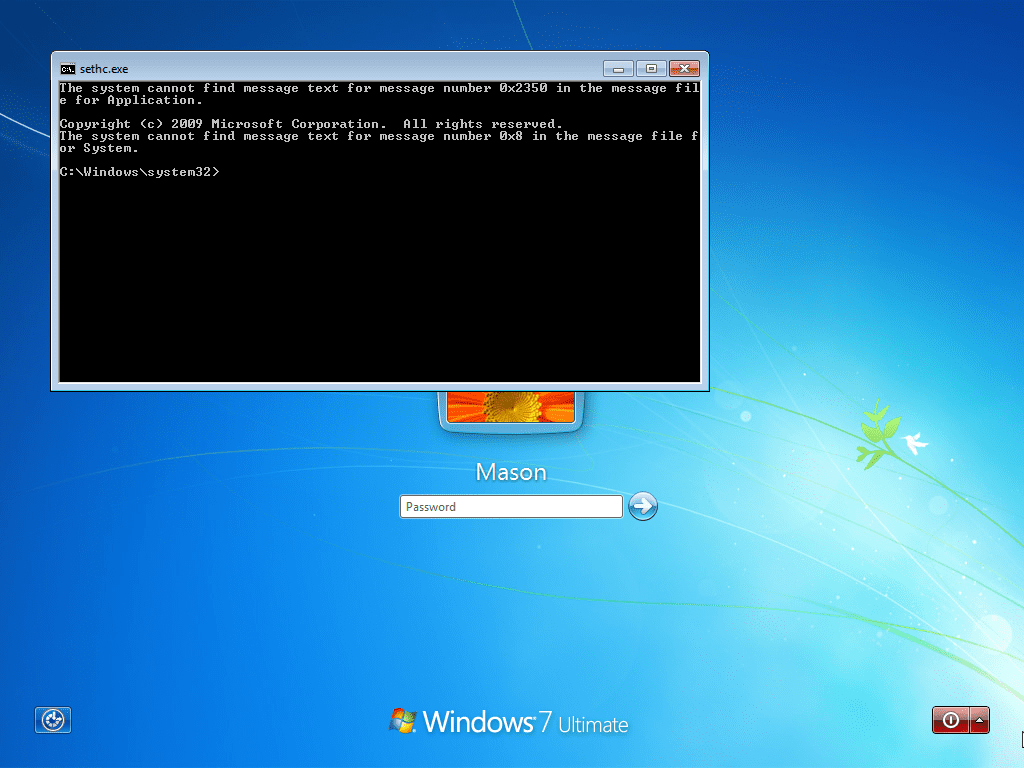
Once you get back to the login screen (where it says “Press Control – Alt – Delete.” Ignore my background, I don’t have that enabled), press “Shift” 5 times to open up the command prompt.


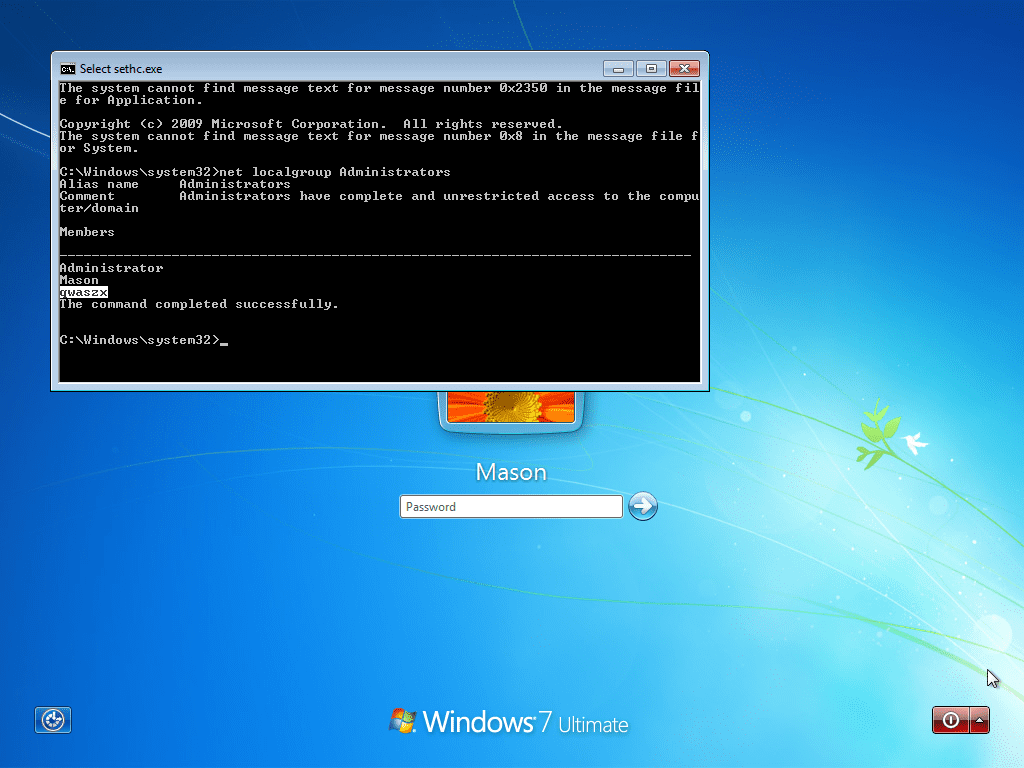
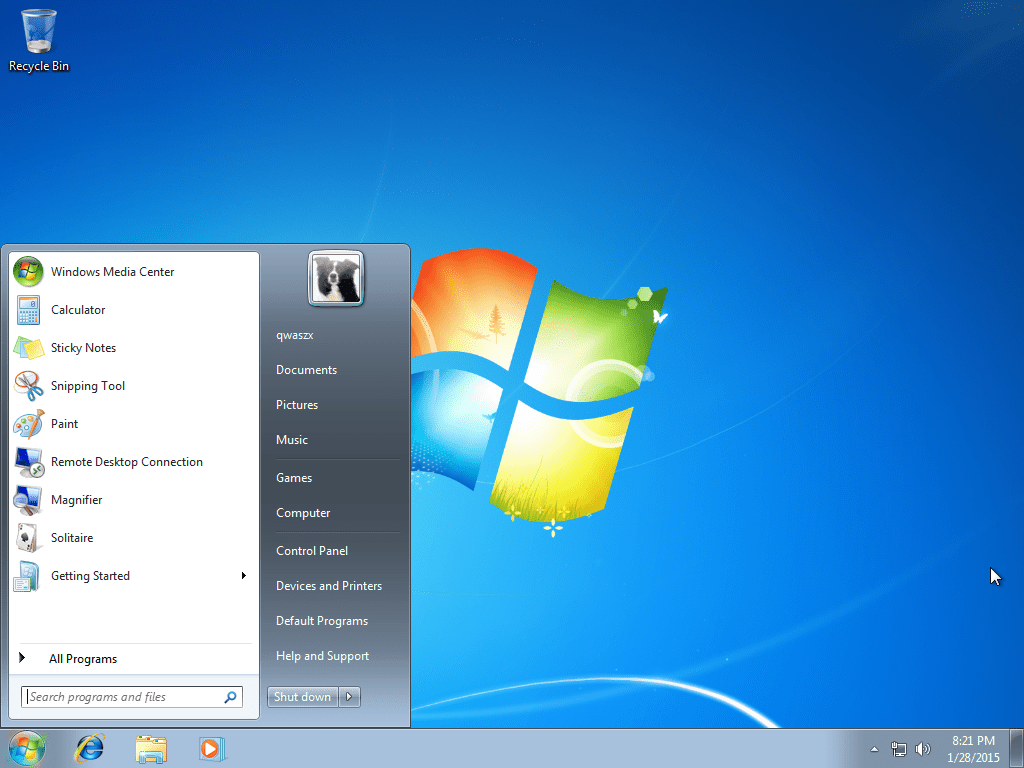
Next, we need to find out what user is the local administrator for this PC. To do this, type “net localgroup Administrators” and look for any administrator that does NOT have your school/work domain in front of it, followed by a “/.” As you can see, one of the admins is named “qwaszx.” You will probably see a name like this, since schools/workspaces tend to make it a random string of letters and/or numbers to ward off people from entering it.


Now, we need to change that account’s password. Type “net user <ACCOUNT NAME HERE> *” and type the new password twice. It will not show what you’re typing, but your keystrokes are being registered. You can now log in to your admin account! However, schools/workspaces also like to disable the admin account you just changed the password for, so you might not be able to log in. There is a simple fix. If you get that message, go to the extra step below.


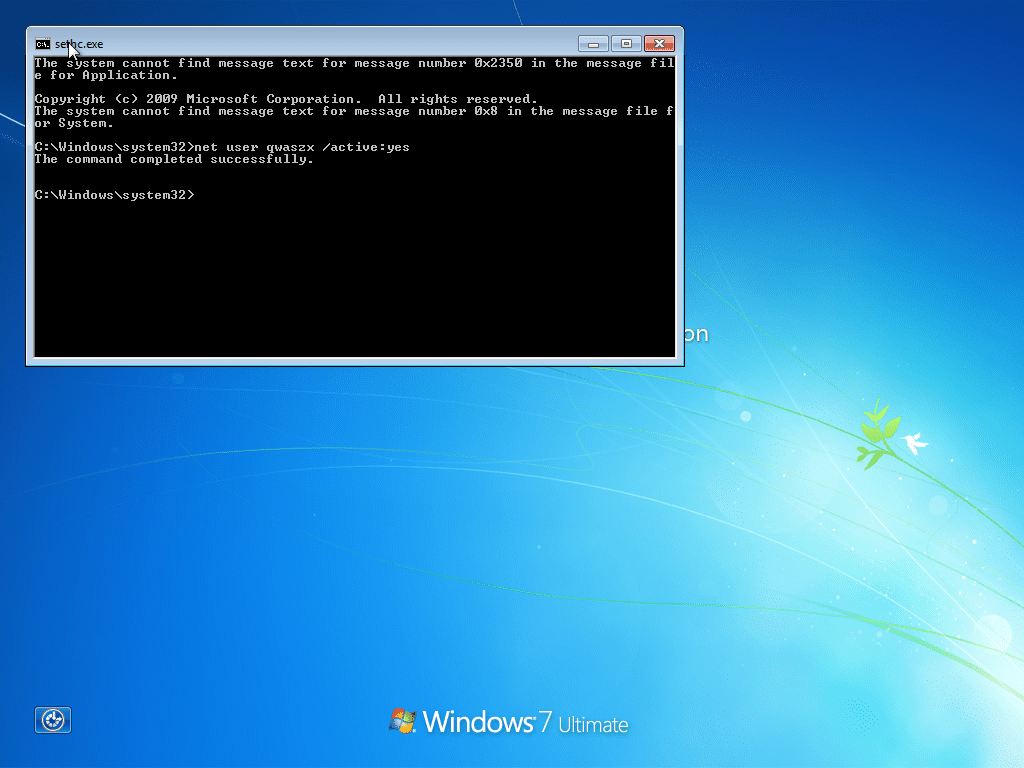
If the admin account is disabled, type “net user <ACCOUNT NAME HERE> /active:yes” You will now be able to log in.


You now have full admin rights to the PC. Enjoy! AGAIN, I AM NOT RESPONSIBLE FOR ANY MISTAKES OR DAMAGES TO THE COMPUTER OR NETWORK. DO AT YOUR OWN RISK!

Thursday, 16 October 2014

Popular Open Source Office Suites

bg
Do you know what is an Office Suite? In wikipedia article regarding office suites, it is defined as
“In computing an office suite, sometimes called an office software suite or productivity suite, is a collection of productivity programs intended to be used by knowledge workers. The components are generally distributed together, have a consistent user interface and usually can interact with each other, sometimes in ways that the operating system would not normally allow”.
In this article, I would like to list  5 most widely used open source office suites. Here I will briefly describe about following office suites.
  1. Libreoffice
  2. Apache OpenOffice
  3. Calligra Suite
  4. NeoOffice
  5. Feng Office Community Edition

LibreOffice

LibreOffice_Logo_Flat
LibreOffice is a powerful, free and open source office suite, developed by TheDocument Foundation. Initially, it was forked from OpenOffice.org in 2010, which was an open-sourced version of  StarOffice. LibreOffice is default office suite in popular GNU/Linux distributions like Ubuntu, Fedora, OpenSuse..etc
LibreOffice has a good collection of essential office software such as word processor, spread sheet, presentation software, drawing software and more. Following section is dedicated for a brief description on different components of LibreOffice.
  • Writer : Writer is word processing tool in LibreOffice suite. It has all the features that we expect from a modern desktop publishing tool. It is simple but is also powerful.
  • Calc : Calc is spread sheet tool in LibreOffice suite. It is easy to use and learn. Even newbies can find their way on go. It can also be used for complex tasks like data mining, data analysis..etc
  • Impress : Impress is a tool in LibreOffce for creating effective presentations.
  • Draw : Vector drawing tool
  • Base : A powerful database managing tool
  • Math : A tool that can used independently or with other tools for creating complex mathematical and scientific formula.
  • Chart : A tool used with other tools for creating useful charts using given information.
LibreOffice also a provide a large number of templates, from which we can choose to match with our requirements.
LibreOffice support different platforms like WindowGNU/Linux and Mac OS X.

Apache OpenOffice

100MillAOO100px
Apache OpenOffice is an open-source office productivity suite. It was derived from the project openoffice.org which was an open sourced version of StarOffice. It is similar to other popular open source office projects like LibreOffice and NeoOffice. Following are different tools included in Apache OpenOffice.
  • Writer : a word processor with flexible functionality ranging from quick letter writing to producing an entire book.
  • Calc : a powerful spreadsheet with all the tools to calculate, analyze, and present data in numerical reports or sizzling graphics.
  • Impress : the fastest, most powerful way to create effective multimedia presentations.
  • Draw : lets us to produce vector diagrams ranging from simple diagrams to dynamic 3D illustrations.
  • Base : let us to manage databases. It provides functions like Create and modify tables, forms, queries, and reports, all from within Apache OpenOffice.
  • Math : let us to create complex mathematical and scientific formula using graphical user interface.
Apache OpenOffice has support for different platforms like windows, Mac OS X and GNU/Linux.

Calligra Office

283px-Calligra-logo.svg
Calligra suite is more than a traditional office suite. In additions to common office tools it also provides graphics tools and project management tools. Initially it was forked from KOffice in 2010. Calligra is the default office suite used with KDE environment. Following tools are available in Calligra suite.
  • Words : A multipurpose word processor aimed at academic, business and personal use.
  • Stage : A powerful and easy to use multimedia presentation that will let us to create attractive and professional presentations easily.
  • Sheets : A fully featured spread sheet application which can be used to quickly create spreadsheets with formulas and charts, to calculate and organize data in neat manner.
  • Flow : A tool used to make diagrams and flow charts. It can be used to make network diagrams, organization charts, flowcharts and much more.
  • Kexi : A visual database creator. It can be used for designing database applications, inserting and editing data, performing queries, and processing data.
  • Krita : A sketching and painting program which offers an end to end solutions for creating digital painting files from scratch by masters.
  • Plan : A project management program which is geared towards projects with multiple resources. Plan offers different types of task dependencies and timing constraints.
  • Braindump : A tool to dump and organize the content in our brain like ideas, drawing, images, texts .. etc
  • Karbon : A vector drawing application with an user interface that is easy to use, highly customizable and extensible.
Calligra Suite also supports different platforms like Windows, GNU/Linux and Mac OS X.

NeoOffice

128px-NeoOffice_icon
NeoOffice is a Mac OS X fork of openoffice.org . It was implemented when there was no OpenOffice support for Mac OS X. It implements almost all functions of OpenOffice using Cocoa frame work. It is using aqua theme of Mac OS X and is closely integrated with Mac OS X.

Feng Office Community Edition

Feng_office
All 4 office suites that I have listed so far was Desktop suites. Feng Office is a web based office suite. Feng Office Community Edition which was earlier known as OpenGoo is an open source collaboration platform developed and supported by Feng Office and OpenGoo community. It is fully featured online office suite. It can be either used as a paid service on official service or can be installed on our server.

References

  1. Wikipedia article on office suite
  2. Wikipedia article on LibreOffice
  3. LibreOffice Website
  4. Wikepedia article on Apache Open Office
  5. Apache Open Office Website
  6. Calligra Office Website
  7. NeoOffice Website
  8. Wikipedia Article on Feng Office